how to draw 3d sketch
How to offset making pixel fine art #ii
Cluster sketching and painting
This article was supported by Patreon! If you lot like what I'1000 doing here, please consider supporting me there :)
Also, this is the role ii of a series of articles, read the whole series here in the Pixel Grimoire.
I'yard using Aseprite for this tutorial. In this commodity I'll teach a technique for sketching and cartoon pixel art that is similar to the process of a traditional painting. I unremarkably call this technique cluster sketching, since I start with big colour clusters and refine them until I'thousand happy with the outcome.
What is a cluster
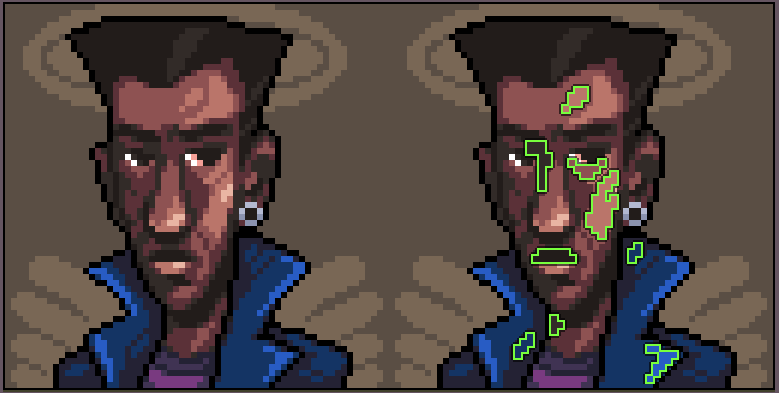
A cluster, too called color cluster or pixel cluster, is a continuous group of pixels of the verbal same color. In that location's some debate whether they tin connect diagonally or not. I believe they do connect, I call that a weak connection and I try to avoid them, but I don't worry too much most it.
While making pixel art, my focus is to take equally few clusters as I can and to avoid ane-pixel clusters past all means. These one pixel clusters are also called orphan pixels and they usually are responsible for the image looking noisy and confusing.
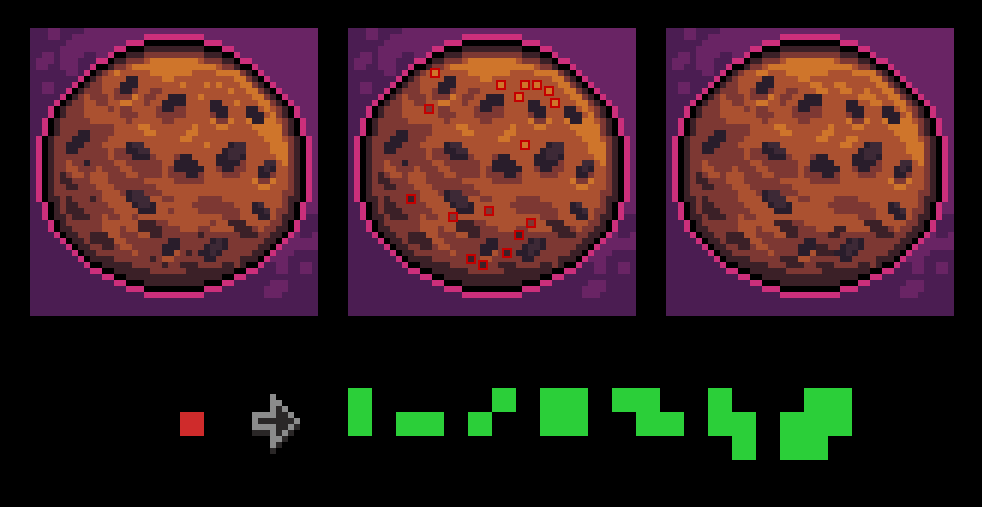
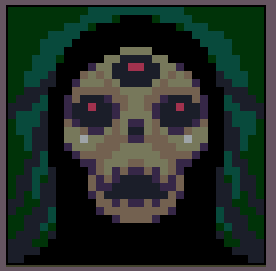
Sometimes you can merely remove the orphan pixel and sometimes you lot need that particular. For the latter I have some favorite shapes to replace the orphan pixel, they are the light-green shapes below the cookies. Merely there are too some cases where they can be used, for texture, anti-alias (I'll talk more than nigh that in future chapters) and for stiff details, like the red eyes of this skull:
Permit'south Draw
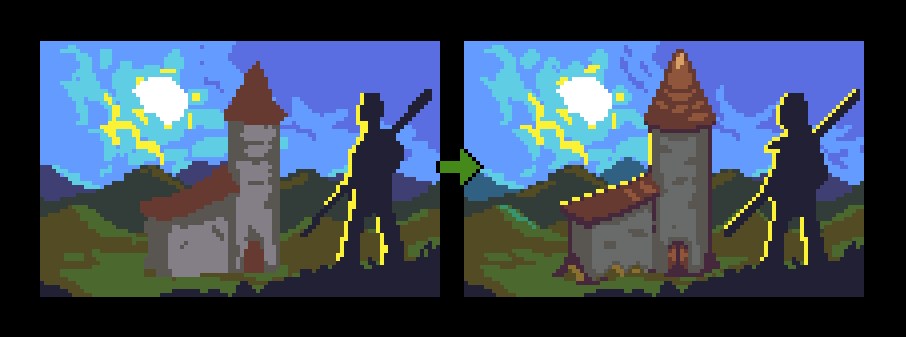
Let's depict something! I'm making a petty scene using the DB32 palette and a really big resolution, 100 past 64 pixels. For this practice a drawing tablet is highly recommended because making natural strokes helps a lot with the outcome.
If you think this scene is besides complex for you, feel costless to tone information technology down by removing some stuff, like the building or the person. Always draw something comfortable when trying out a new technique. If you feel like the canvas is too small or also big you can also change the size a piffling, merely I wouldn't go smaller than 64 or bigger than 128 pixels, at least not for now.
Pace 1: Big clusters
Terminal time we sketched with lines and then we filled the interior with colors, this fourth dimension we will start direct away with the colors. Just do a very messy version of the image you want to practise, focusing on choosing the colors and the vibe you want. Favor gestural movement and do not add item.
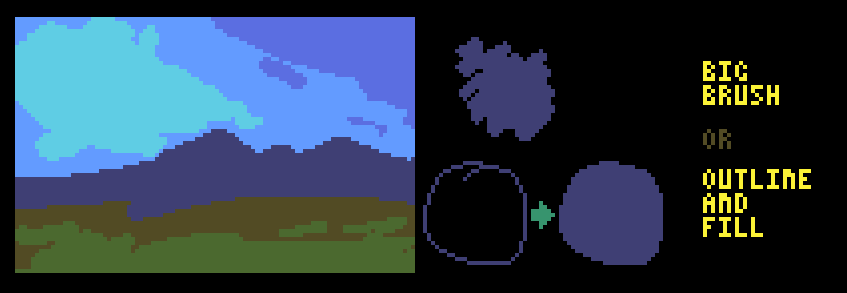
The idea with this technique is to start with big blobs of colour and go smaller each step. This is one of the few situations that information technology'southward OK to use the castor tool with 2 or even three pixels size. To increment and decrease your castor size, use the "+" and the "-" keys. Another way to do this is to draw the outline of the cluster yous want then but fill it with the paint bucket tool (G key is the shortcut).
Step 2: Refine
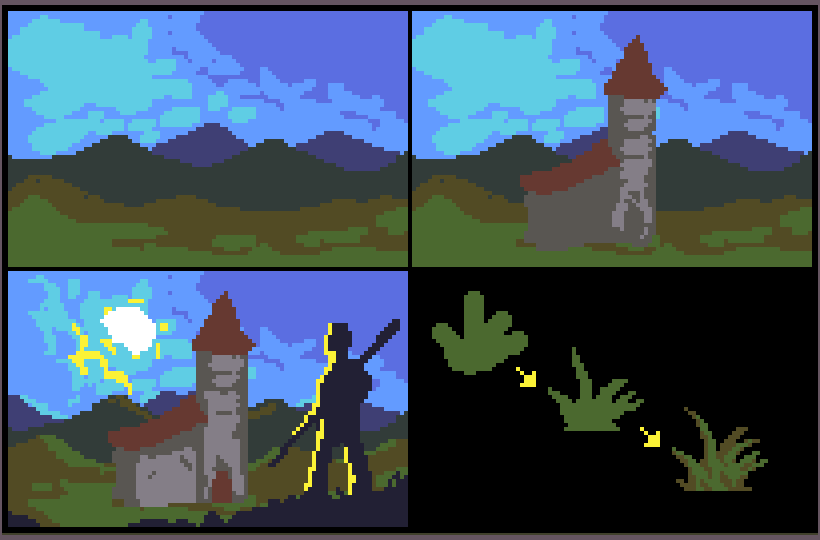
You lot tin also come across that I kickoff with the far back, like the sky and mountains, and so add the building, so the silhouette in the offset plane. This is a mutual painting technique and like nearly painting techniques it also works well with pixel art. The idea is to have your foundation ready before placing things on top of them, this manner information technology's easier to choose colors and the scale of the objects.
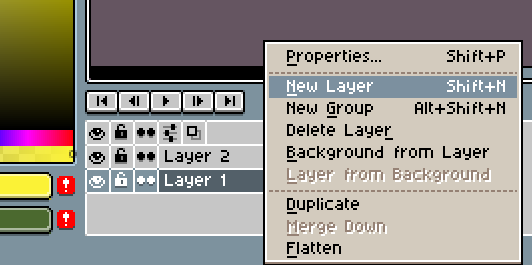
I also like to work with layers on images similar this, with the sky, the building and the first airplane being in different layers. To create a layer, correct click the "Layer 1" in the timeline on the lesser of the screen, and select New Layer. Y'all can have equally many layers equally y'all want but I always try to work with as few layers as I can, otherwise things tin get too messy.
Step 3: Fix jaggies and add together detail
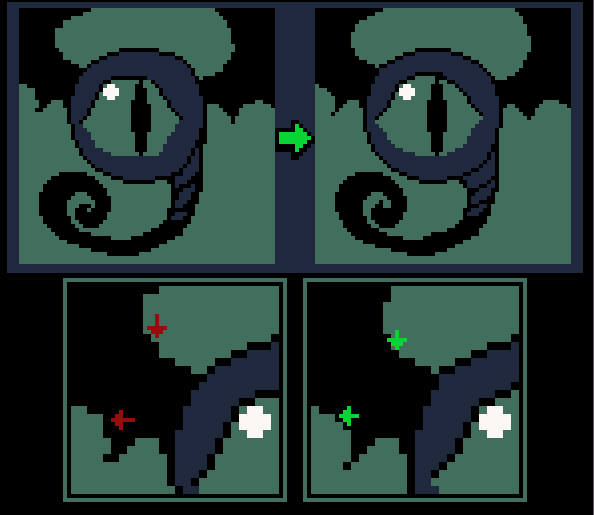
What are jaggies? OK, this will sound like information technology'southward super complicated, but I promise it isn't.
Jaggies are unintentional corners that appear in pixel fine art, unremarkably when making natural hand movements, equally a side effect of the lack of anti-alias.
Imagine that the border or line you are trying to fix is a staircase, you lot demand to apply some logic to the number of pixels in each step. We demand to manually count pixels and make sure that the number of pixels in each "footstep" increases equally the curve approaches a horizontal angle and decreases every bit it approaches a vertical angle.
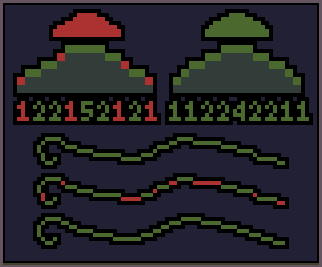
Let's pause this down. Every line or cluster border should follow some kind of logic. Y'all can see in my example that the corporeality of pixels in each stride on a perfect curve goes up and so goes down. That'due south how curves deport, they commonly follow some geometrical progression, exponentially going upwards or down.
The jaggies are just "missteps" on that logic. It's when a footstep size all of a sudden goes downwardly and goes upward again in the centre of a a curve (or the other way around). The numbers can go loftier or low really fast, that's not a problem, every bit long as the curve logic applies.
To fix them you lot push pixels around to make the steps follow a steady number or to make it increase or decrease correctly.
Let'southward get back to our image now.
The idea here is to "describe the remainder of the owl" mainly by looking for jaggies and fixing ane by 1. While doing that I'm constantly adding details, stronger dissimilarity, better low-cal, etc. It'south not a very organized process only it gets the job done.
At present What?
Now it'due south time to practice! If a complete scene is too much for you, endeavour starting with something simpler, like a rock or a tree stump. This technique produces very organic and painterly results, and so it's bang-up for backgrounds and for drawing nature, like plants, water and mountains.
Keep reading the office 3 hither!
Source: https://medium.com/pixel-grimoire/how-to-start-making-pixel-art-2-bcd705cb04d7
0 Response to "how to draw 3d sketch"
Post a Comment